Garbage in Garbage out
At its most basic level, we have 3 physical inputs into our bows (plus another optional one). Bow hand, string hand and the eye doing the aiming. These are the interfaces through which you put your target solution into the bow to make it shoot its bestest. They are also, unfortunately, the interfaces that creates those shots that has you close to rage quitting archery. We've already written about two of them. Lets review then poke the third with a big stick. This will be a predominately recurve discussion cause all that string walking malarkey is black magic .. we'll see if we can get a Grand Wizzard of the Barebow to write us a cantrip on how they hook and draw sometime in the near future. Better lay in some salt for a protecting pentagram though. But first, a quick flashback ..
Lets start with the input into the bow being generated by you aiming. 80% of our sensory input comes from our eyesight which makes it pretty overwhelming. You can be so focused on aiming that everything else .. form, posture, release .. goes out the window but there is a drill to get away from this total dominance of sight. Its blank boss where aiming is de-emphasised as there's no target to aim at. Its all about the rest of the shot. We discussed blank boss a little while ago and that article can be found here.

As abrasive as the owner!
The bow hand is the interface through the riser itself. It allows fine tuning in the up/down, left/right axes but that also allows the input of dodgy data. Here the grip of the bow is the problem. If you push too much with the heel of your hand (low wrist), you'll drive the arrows up the face. Too little (high wrist) and the arrows will drop. Torque the bow left and right with your wrist and the arrows will go left and right. We fixed the left right issues with string picture which we looked at in a previous article found here. Proper hand placement requires the webbing between the thumb and forefinger pushed well into the handle to prevent the bow slipping on sweaty hands. Making the handle less smooth will also help here. Either with a wrap - specialist wraps are preferable as tennis racket wraps tend to be too soft and spongy. Perhaps a new custom handle … OooooO sexy. Or, for the masochists, a strip of abrasive slip preventer (see Geo for details) that will stop movement but will exfoliate your hand like a good sandpapering would. The handle itself should push against the meaty pad at the base of the thumb and the pressure kept constant. i.e. no rocking of the wrist. The fingers should not grip the handle and its the drawing of the string that keeps the handle in place on your relaxed hand. (see finger/wrist/bow sling article). After that its kinda on you to get a comfy hand/wrist position and stick to it.
Brady with little pressure on the ring finger
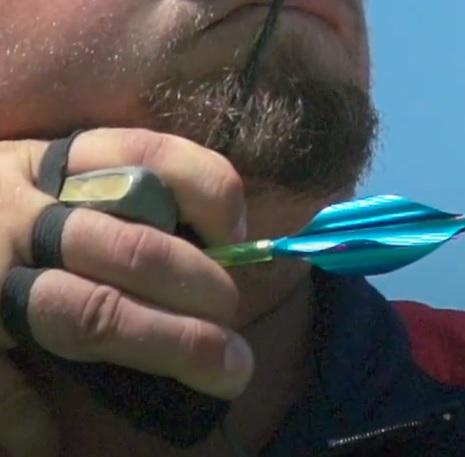
The third interface point is your string hand and your hook on the string. So firstly, the back of your string hand needs to be straight. What you shouldn't do when drawing is start to make a fist to help the draw get to anchor. This will mess up your draw, ease of release and the pressure on your fingers. How much pressure should there be on each finger? Well annoyingly, there is no right answer. If we categorise percentage pressure in the order of index, middle, ring finger .. people have been successful with 40-60-0 all the way to 30-50-20 with our editor favouring 40-50-10. As long as you are consistent with the pressure, you will get consistent results and that's what we are aiming for (pun intended). To be honest, the key fingers are the index and middle fingers. The ring finger pressure is really just holding the apex of the string open. This will allow you to get your fingers out of the way easier at release, something compound engineered their way around with the D loop and the release aid. Looking at your tab can give you a good insight into what you are doing with your fingers. The tab will show wear patterns and these will show you what's happening at the moment of release.
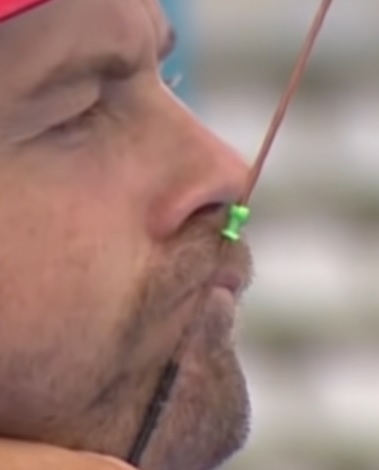
A nose kisser in action
Finally, and optionally, there's the string and its relationship to your face. You can put a "kisser" on your bow. This is either serving thread, a brass nocking point or a small piece of plastic served onto your string. This serves as another reference point by locating it on the string so that it always pulls to the same point on your face each time you come to anchor. Its called a kisser because the original point of reference was the corner of the mouth/lips. However, in the last couple of years a nose kisser" has been made legal and used to great effect by Brady Ellison at one point. Using a kisser of some type means you gain another checkpoint towards consistent draw. You don't actually need anything on the string to pull it into your face/nose/lips but having something there to pull to a specific bit is helpful in keeping the draw consistent. See Geo for a demonstration of how a nose kisser works.
Pull all of the above into your shot .. and with a solid string picture, good hand placement, a reliable hook, consistent targeting information via the Mk1 eyeball plus a kisser … there's no way you can miss the 10 ring … you would think! ;o) But you can be a lot more trusting in your shot if all of the above are reliably replicable. Archery is the art of repetition after all.
Discover more from Glasgow Archers
Subscribe to get the latest posts sent to your email.